Workspaces #
Workspaces provide access to the main features of the portal and allow users to collaborate and share. Through workspaces, users can access:
Workspaces allow information to be shared between users in an ordered way. A user requires access to a workspace before they can start to use the portal. However, are not limited to one; users can have access to multiple workspaces allowing them share reports and views between different departments or teams.
note
Access to create additional Workspaces is controlled by your license level.
info
If a user has only been assigned to a single workspace, the Workspaces interface will not appear and the user will be presented with just the Reports, Wallboards, Filters and Schedules elements of the single workspace.
Switching Workspace #
The current workspace will appear on the left-side navigation panel along with the workspace initials or image:
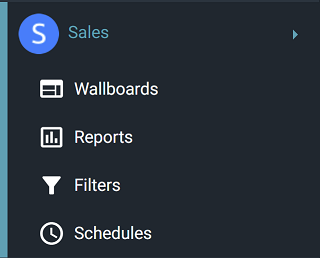
The image above shows the user is currently working in the 'Sales' workspace. To change the active workspace, click the arrow to the right of the current workspace:
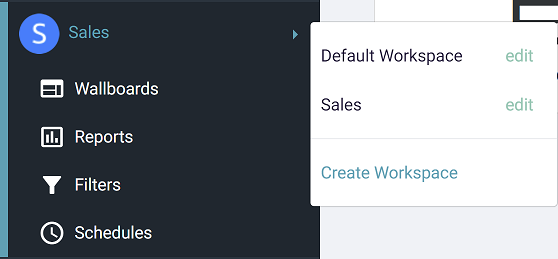
In the image above two workspaces are listed as being accessible to the user: 'Sales' & 'Demo Workspace'. To change the active workspace, simply click on the name of a different workspace.
Managing Workspaces #
If you have the necessary user permission, you can create a new workspace by clicking the 'Create Workspace' link at the bottom of the workspace selection menu. In addition, anyone with the 'Admin' role on a workspace can edit it's settings by clicking the 'Edit' link next to a workspace on the workspace selection menu.
Each workspace can be given a name and avatar to allow it to be easily identifiable.
When creating a new workspace, 3 options are available:
- Blank workspace - Start with a new empty workspace
- Create from template - Choose one of the default workspace templates to start with
- Clone existing workspace - Make a copy of an existing workspace as a starting point
Whichever starting point is chosen, the new workspace can be customized as required after it has been created.
tip
If only assigned to a single workspace, workspaces can be created and managed through the Settings area of the portal.
Default Workspace #
One of the Workspaces can be configured as the 'Default' Workspace. When this is done, any new user created on the system and given access to analytics, will be automatically given access to the default Workspace. This can be overridden when creating a user if required.
tip
Enabling a Workspace as the default will not change the Workspace assignment of any users. They will need to be re-assigned if required.
Templates #
When creating a new workspace, templates provide the option of starting with an empty workspace or one which is already pre-populated with commonly used reports/real-time views.
| Default Templates | Reports | Dashboard Views | Wallboard Views |
|---|---|---|---|
| Blank workspace | n/a | n/a | n/a |
| Call Management |
|
|
n/a |
| User and System Analytics |
|
|
|
| Agent and Queue Analytics |
|
|
|
note
Templates provide a starting point, workspaces can be customized as required with any of the available reports once created.
Members #
Workspaces can be assigned to one or more user on the system (and a user can be assigned to one or more workspaces). There are varying levels of access which can be granted to a user on a workspace.
The table below outlines the different workspace roles available when assigning a user. By default, the user who created the workspace assumes an 'Admin' role.
| Role | Description | Manage Users / Settings | Create/Modify | Filter | Run/View |
|---|---|---|---|---|---|
| Admin | Has completed control over the workspace. | Yes | Yes | Yes | Yes |
| Contributor | Create manage content1. | No | Yes | Yes | Yes |
| Member | Can access content1 and apply filters (Reports only). | No | No | Yes2 | Yes |
| Observer | Can access content1 only. | No | No | No | Yes |
info
Any user with 'Run/View' permission to a workspace can configure a linked client (e.g. FireTV Wallboard).
Reporting Settings #
The report settings configured at workspace level will be applied to any reports/views configured within the workspace.
info
Changes to any of the settings below will take effect next time a report is run or view is opened.
Call Thresholds #
Call Rate Period
This period is used in various reports and statistics to show call data for a period of time:
- 'Calls by Time/Day etc' templates, the call rate period is used to define over which period calls should be grouped together.
- 'Calls by User' template, used to define the rate for the rate statistics e.g. 'All Calls Rate'
These reports/statistics allow the call traffic to be analyzed over smaller time periods than a day, helping to identify trends.
Default = 30 minutes.
Ring Duration Thresholds #
Ring duration thresholds are used for Abandoned Call and extended Service Level statistics. They allow lost call and service level statistics to be broken down over various time periods, allowing more detailed analysis of when calls are lost etc.
| Ring Duration No. | Default Setting |
|---|---|
| 1 | 10 seconds |
| 2 | 20 seconds |
| 3 | 30 seconds |
| 4 | 40 seconds |
| 5 | 50 seconds |
| 6 | 120 seconds |
Service Level Thresholds
When viewing grouped reports, abandoned and answered call percentage fields will be grouped by the ring durations configured here.
For example:
- Field '% Abandoned <= SL1' will show the percentage of calls abandoned before 10 seconds of ring time.
- Field 'Answered <= SL5' will show the number of calls answered before 50 seconds of ring time.
Scheduling Settings #
Any user without access to the workspace/portal will not be able to access the reports generated by the scheduler by default.
To allow external users access to the scheduled report output, a password can be configured against the workspace. This password can then be manually shared with any person to allow them access.
info
If no password is configured against the workspace, only users with the appropriate workspace permissions will be able to view scheduled report output.